
Initial setup and VM creation
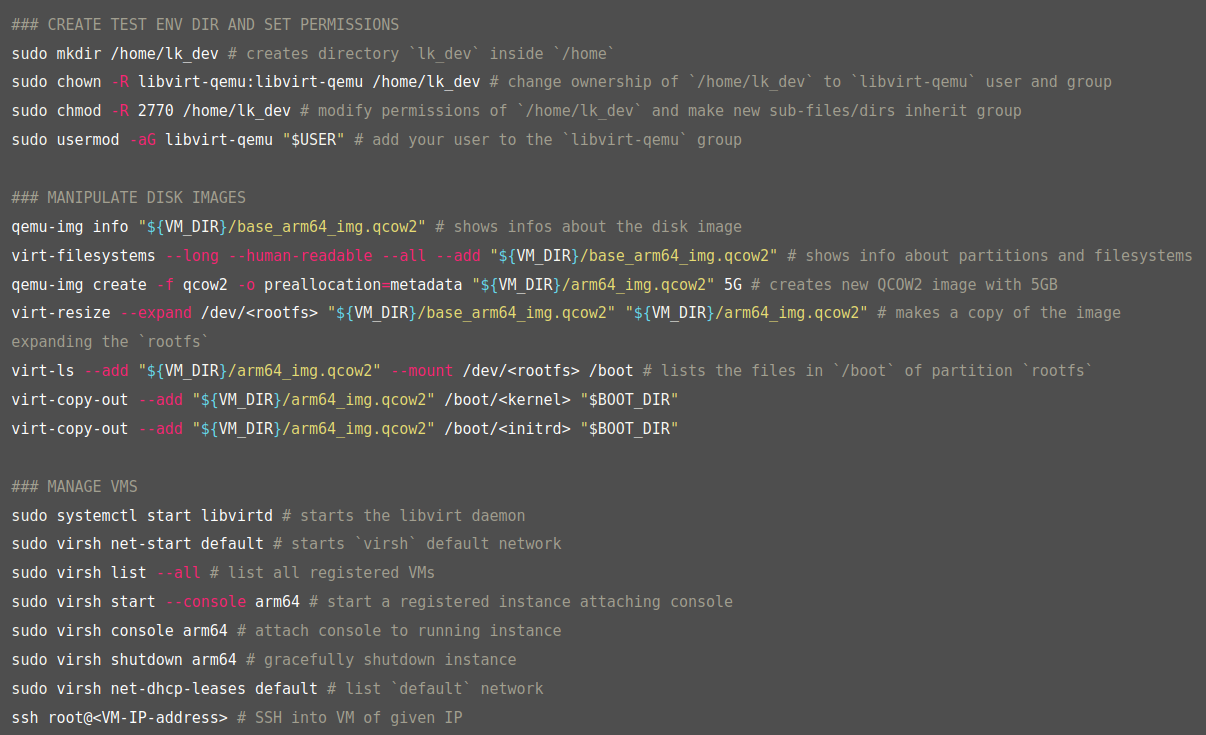
The first step in the Linux contribution journey is setting up the development environment. This was done using virtual machines to isolate our actual environment from the testing environment and enable development.
To do this, we used QEMU, an emulator to create the virtual machine, and libvirt, a management tool for these VMs.
First, it was necessary to download dependencies, and then we created a shared workspace where both we and the virtualization system can operate. A script was also created to gather some important utilities for development.
Activities must be performed with the script active, which can be done by running the line below in the terminal:
/home/lk_dev/activate.sh
We downloaded a Debian image to use in our VM. Since the image mentioned in the tutorial is no longer available, we had to access the Debian website and look for a similar new image. The image has the following characteristics:
-
Distribution: Debian 12
-
Version: nocloud
-
Architecture: ARM64
We also resized the image to avoid running out of disk space in future tasks.
After that, we extracted the operating system’s boot components so that we can control the boot process externally via QEMU. Making an analogy with a car, it is as if we were taking the “engine” (Kernel) and the “ignition key” (Initrd) out of the car (disk image) to store them where we can swap them later.
With this, it was possible to create our VM with QEMU:
launch_vm_qemu
The login user is root, with no password. We can exit the VM by typing:
poweroff
When restarting our host machine, we need to run the following to use the services:
sudo systemctl start libvirtd # starts the libvirt daemon
systemctl status libvirtd # shows the status of the daemon
sudo virsh net-start default # starts `virsh` default network
sudo virsh net-list
From this point on, we stopped using QEMU to create the VM and started using libvirt instead. libvirt is a service that runs in the background. It allows for:
-
Persistence: The VM can run without an open terminal.
-
Simplified Networking: It automatically creates a network bridge (virbr0) so your VM has internet and you can communicate with it easily.
Useful virsh commands
virsh is the main command-line interface for managing virtual machines via libvirt. Below are the most common commands for handling the arm64 VM:
| Goal | Comando |
|---|---|
| List all VMs | sudo virsh list --all |
| View VM information | sudo virsh dominfo arm64 |
| Start with console | sudo virsh start --console arm64 |
| Graceful shutdown | sudo virsh shutdown arm64 |
| Force shutdown | sudo virsh destroy arm64 |
| Remove VM registration | sudo virsh undefine arm64 |
Connecting to the VM via SSH
Since the image used in the VM did not have SSH support, it was necessary to install it. Some changes were also made to allow connection without a password and via root login.
We can find the VM’s IP with the command below:
sudo virsh net-dhcp-leases default
With this data, we can connect to our VM via SSH:
ssh root@<VM-IP-address>
Finally, we saved the list of kernel modules currently loaded in the VM for future activities in a file named vm_mod_list